Translate

Showing posts with label Valentine. Show all posts

Wednesday, February 11, 2015

Another Valentine's Nail Art

It has been a long time since I have been involved with Llama Nails, but they are having a Valentines theme this month and since I have so many ideas rattling around in my head, I figured I would join in.


For some reason I have been forgetting to photograph my base colors.  It is sad because this is such a pretty polish.  It is Zoya Veruschka, the smooth matte sister of Chita.  I love wearing green polish, so I thought this would be a good choice.


Next I stamped with Bundle Monster BM-317, PUEEN30 and Maybelline Bold Gold.  So many hearts and only 28 days in February!


I then filled in the hearts with Seche Vite top coat.  It brings out Veruschka's sparkle.  Reminds me of emeralds!


Since the I stamped a bit low with the "Love" stamp, I dotted some hearts on the ring and thumb with Seche and outlined them with Bold Gold.  It wasn't very delicate, but I still am happy with them.


Although this lasted several days on my tips, the effect of matte vs shiny did not.  The Seche wore down and Veruschka gained some shine from the buffing that happens through every day life.  Still looked pretty though.


My mood stone seemed appropriate for this, don't you think?  Thanks for looking and commenting!

Tuesday, February 10, 2015

Purple Heart Nail Art

I feel I must start this post with an apology.  It is that time of year when it is constantly cold and it seems that no matter what I do, my hands look like those of a 50 year old smoker.  My cuticles are not too bad since I constantly take care of them, but my skin is constantly dry.  It doesn't help that I am also losing weight.  I mean, it does help my health, but I find that even though I have been keeping well hydrated, my skin is "loosening" and showing that "crepiness", like crepe paper, full of wrinkles.  I need a good paraffin wax!

Today's post is for The Crumpet Nail Tarts Pick-n-Mix challenge.  The theme is purple or/and hearts.  I decided to go with "and".


 I have to admit that I had a very hard time with this manicure.  Not this design exactly, but with the whole hearts thing.  I will have many varied valentines manis this month, so I had plans for this one.  I wanted a cute stamping french tip.  M80 to be exact.  However, my M80 is a fauxnaud (Konad knockoff)  I purchased this before developing a conscious about those kind of things.  I was going to stamp in white and fill in the hearts with pink.  Cute idea!  It just was not meant to be.  I tried every combination of white and stamper that I have.  I tried stamping directly onto my nails and as a stamp decal.  Nothing was working.  I finally gave up and grabbed another image I had set aside for Valentine's Day.


PUEEN SE01B.  That cute swirly winged heart.  Once again I tried a couple different white polishes and a couple stampers.  So frustrated though I just gave up.  I have never had so many problems stamping!  I just grabbed another plate and went to work.


I finally settled on PUEEN 68 with much better results.  I was so sick of stamping, however, that I didn't even care if I got my lines straight, just slapped it on my nails, took pictures and said DONE!


This is what I ended up with.  I started with three coats of Dance Legend Mist Way Be Mine.  Such an appropriately named polish for this nail art.  I stamped with the aforementioned PUEEN 68 and A England Lady of the Lake.  The next morning I woke up and went "Ugh!".  I couldn't stand it, so one dimensional and boring.  I decided to add something more.


I filled in some of the hearts with Blue-Eyed Girl Lacquer If You're a Seascape, a pretty bubblegum pink holo.  Still not satisfied, but I didn't want to make all the hearts pink.


Instead I grabbed A England Lady of the Lake again and filled in the rest of the hearts with it.  "Sigh".  Much better, but it sure took enough work to get it to that point!  Look how it all sparkles!  My hearts are now happy.


Despite all the trouble, the wonky stamping and my sloppy hearts, I ended up still liking this.  Maybe because I worked so hard at it?  Sometimes nail art is just a pain in the fingertips!

Check out the other purple/heart nail art (I love it when something rhymes).  Let me know if you think I succeeded or if I should have given up a long time ago.  (tee hee)  Thanks for looking and commenting!


Wednesday, May 7, 2014

#TGPNPC Holo Love on Bria's Tips

Quick little post today as I am spending time with my mother-in-law on my day off.  Today's prompt for The Glitah Pirates Never Ending Pile Challenge is holo.  I have so many holos, it is amazing to me how little I wear them.


These are Bria's purdy tips.  I considered this to be a fail, but Bria LOVED them.  I let her pick the colors and stamps.  Guess she didn't get enough love on Valentines Day.


We started with a vertical gradient of Hits Ares and Colors by Llarowe In the Navy.  Both of these are gorgeous holos, I just was a bit disappointed that they didn't blend very well together in the middle.  I really wanted it to look more purple in the blend, but it wasn't in the cards.


Finally, we stamped with a couple of images from Winstonia W207 and Konad Special White.  Thanks for looking and let me know what you think in the comments!

.


Sunday, February 16, 2014

Barielle Nude & Naughty Review


Earlier this month I was contacted by Barielle.  They asked me to join their blogging family!  I was sooo excited.  I already have a few Barielles in my stash and I love them.  The nice thing about Barielle is that if you sign up for their emails, you get a lot of special offers.  I received several nail care products.  Since these are items that need some time to test, I will be telling you about them later, but today I am going to show you the polish!


I received the Nude & Naughty set.  Although I received this as a set, you can purchase the colors individually.  It is more cost effective as a set at only $5 per polish compared to $8 individually.  However, they often have specials, so if you are in love with only a shade or two, you can always wait for the right time to pounce. (tee hee)  I am so happy to get my hands on these...or this on my hands :)  First let me tell you a little about Barielle.  See that little horse jumping over the B?  You can barely see it in this pic, but it is on all their logos.  Why?  Let me have them tell you why:


A Unique Approach to Nail Care, Hand Care And Foot Care

Over 30 years ago, Barielle introduced "Nail Strengthener Cream" as the first nail care product of its kind. Originally formulated to condition the hooves of million-dollar thoroughbred racehorses, this legendary skin care product helps nails grow healthier and stronger while resisting splits, peels and breaks. Its effectiveness launched Barielle as a nail and skin care company with unique products and approaches to treating, protecting and maintaining nails. Barielle has since evolved into one of the leading prestige nail care, hand care and foot care brands sold in the world, known for our cracked feet treatments and the best moisturizers for dry skin.

There you go, horses.  Who knew!  I am currently testing the Nail Strengthener Cream and can't wait to tell you about the results!  There will be contact info AND some nail art at the end of this post, but for now, lets get right to these on trend nude/beige family shades.  All of these are shown with top coat and have good to average dry time.

Barielle Very Bare

Barielle Very Bare - 4 coats
You are only getting an artificial light pic because my flash was washing this out to a pure white.  Very Bare is described by Barielle as an "opalescent pink".  I don't see any shimmer, which I would relate to the term "opalescent".  Instead I found this to be a pretty delicate pink cream.  I used four coats because it is a bit sheer and, like many pastels, was a bit streaky  However it has a heavenly self leveling formula that makes the many coats easy to apply.  Now that I know the sheerness of this one, I will use my milky ridge filler as a base, which would probably reduce the number of coats needed.

Barielle Pillow Talk
  

 Barielle Pillow Talk - 3 coats over Orly Ridge Filler
Pillow Talk is the palest peach to ever grace my tips!  I LOVE this shade.  For some reason, none of my artificial light pics survived the cut.  Probably not color accurate?  This formula was not as streaky as Very Bare, but applied just as well.  I have a weakness for peach nail polish, but there are not as many out there as corals or pinks.  Such a ethereal color, it makes me feel feminine, but in a vintage way, like faded love letters or Victorian lingerie.  So purdy!

Barielle No Not Now - With Flash
Barielle No Not Now - Artificial Light

Barielle No Not Now - 3 coats
I love the name of this polish!  And the color?  Nothing short of outstanding!  This toffee color is filled with a pearly shimmer that gives it a depth not expected from such a simple tone.  The pearl finish is subtle, which means that it doesn't show the dreaded brush marks!  I feel like this is a more sophisticated take on "mannequin hands".  I expect this one to be used often as it is very office friendly, but still with that something unique that takes it outside of the norm.

Barielle I Got a Headache - With Flash
Barielle I Got a Headache - Artificial Light
 
Barielle I Got a Headache - 3 coats 
You can skip my description, if you want, but you MUST read the second paragraph to get the best finish for this lovely.  I Got a Headache, my favorite of this set.  Once again, a perfectly named polish!  If you have ever had a migraine, you will know why I think this dusky carmel is perfectly named.  It is filled with a golden shimmer, just like the sparks of jagged pain associated with these headaches on steroids.  I guess some may consider this a fugly color, but it just calls to me.  It has adorned my tips THREE times since I received it.  That is unheard of for me.  One of my coworkers called it a "baby poo" color, but I just don't care.  I am obsessed with this lit from within beige.  

Now, let me talk about the "coatage" on this.  Some of you may know that for swatches, I always paint to opaque and then add one more coat for MP (micro pic) coverage.  This is the only polish I have ever used that I would have been happier with at two coats.  With three coats, the base color darkens and overwhelms the gorgeous shimmer, which is what makes me love this one so much!  The nail art further down the post will show two coats, so you may be able to see what I am talking about.  One coat would be even better, if you don't mind VNL.  I may have to do an I Got a Headache coatage ombre soon!

Barielle In Good Taste- With Flash
Barielle In Good Taste - Artificial Light
 
Barielle In Good Taste - 2 coats
If you follow me, you will have seen In Good Taste used for some chocolate nail art on Friday.  If you missed it, you can check it HERE.  This is a great self leveling formula that could have been opaque in one thick coat.  It really does look like molten chocolatey goodness at my tips!

You know I couldn't resist doing some nail art with I Got a Headache.  This was my Valentine manicure and is still flashing its shimmery goodness at me as I type :)


This just makes me smile.  It is not your typical valentine mani, which is part of why I love it!  Plus, brown and pink is a favorite color combo in my color obsessed world.


I used two coats of I Got a Headache for the base.  See what I mean.  The base is not as greyed and the shimmer is more....I don't know....uniform...delicately distributed?  

I then stamped with BM-019 on all nails but the pinkie, where I used BM-19.  Then I used my smallest dotting tool to create those miniscule hearts with Barielle Belly Dance.  I purchased this in a blog sale, and it is no longer available on thier site, but if you can manage to get your hands on it, I highly recommend it!  It is the girly sister of No Not Now, a taupe base with a pale pink pearl finish.  (Ah alliteration, how I love you)  You can't see the pearl in these itsy bitsy hearts, but believe me, it is there.  So lovely!  I would have swatched this one for you too, but I hate showing you what isn't easily available.  When I Googled it, it seems there may have been two different formulas, because a lot of the swatches from back in 2010, with the old bottles, seem to have a purple lean to them.  There is not even a hint of of purple in my bottle.  Okay, enough, back to the nail art.


I just love how these two colors compliment each other.  And the stamp!  I like to call this one "Love on a Wire" (tee hee).

You can find Barielle Products HERE 
Sign up for their e-mails at the bottom of their site for upcoming specials!  I know from experience that they only send out notices when they have a new collection or specials.

Here are a few ways to follow them on the social networks:
Twitter:  https://twitter.com/barielle
Facebook:  https://www.facebook.com/barielle 
 

Friday, February 14, 2014

NAGGDay14 - Sweets


Wanna hear something funny?  Every day of this challenge, when I go to post, I have said, "Hmmm what day (number) of the challenge is it?"  Then I count the number on the NAGG banner.  Yesterday I realized that, duh, the number is the same as the date.  Yes, I am that spacey!


Um, yeah...CHOCOLATE!  I was inspired to do this from a mani I saw at Style Your Nails HERE.  Go check what she did (her's are more intricate than mine).

With Flash
Artificial Light

 I started with two coats of Barielle In Good Taste.  Did you see the PR button up there?  Yep, Barielle has been reaching out to the nail blogging community and asked me to review their products.  There will be a full review on the blog this weekend, so watch for it!  And yes, my nails are longer in this swatch pic than the nail art pics.  I swatched these before my nail patch gave out.  Oh well, it happens :(  

In Good Taste is perfectly named!  This is a lovely cool brown in some lights and a bit warm in others.  There are a lot of browns out there that people call "chocolate brown", and I have a few in my stash, but this one is the most chocolatey I own.  That is why I chose it for today.  For me, no Valentines day is complete without some kind of chocolate, so why not wear it on my tips.


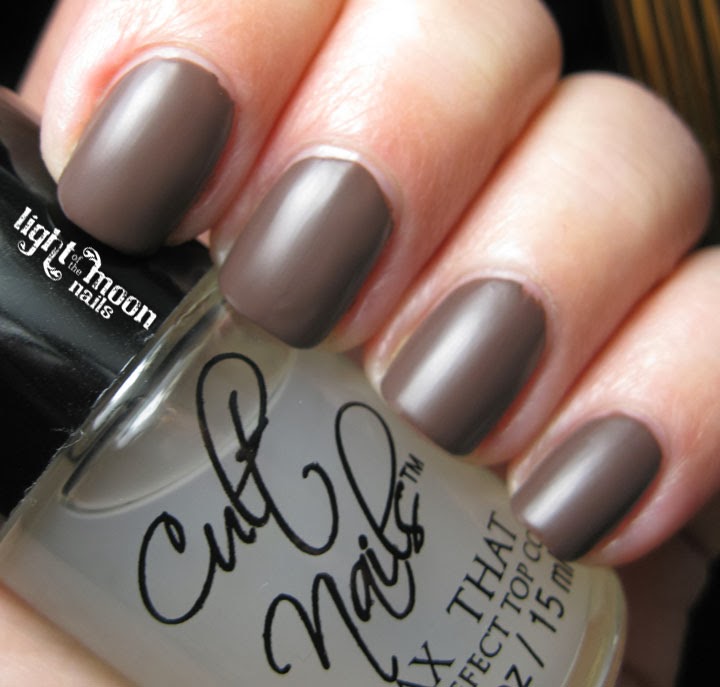
Chocolate, however, is not highly reflective, so I added Cult Nails Wax That.  I had been wanting to try this "matte" topper for awhile, and when they had their top coat sale, I snatched one up.  I love that this diminishes the shine, but not all the way, like some mattes.  I really does end up with a "wax" finish.


Next I used the spun sugar method to add some "chocolate" drizzle and hearts.  My plan was to leave it at this stage, but I wasn't happy with it.  The mistake I made was getting the polish to gloopy before I did the hearts.  I just could not get a good heart shape with the polish so thick.


So to accent the nails, I mixed a bit of In Good Taste with some white and defined the hearts a bit more.  Although I think it isn't too bad, it definately is not my favorite so far in this challenge.  I think I just need more practice with the spun sugar technique.

Thanks for looking and commenting!  See you tomorrow!


Thursday, February 13, 2014

#NAGGDay13 - Hearts

This is, once again, nail art that I have been anxious to post.  It was one of the first ones I did for this challenge and I am smitten by it!


Why do I love it?  First, because it is not your typical valentine/hearts color scheme.  Secondly, I took a stamped mani and built on it until it looks more like intricate nail art.  Not that stamps can't look like intricate nail art...but let's be honest, they usually still look like stamps.  Please excuse the pic heavy post, I just love this one too much to limit myself!


This pic makes me miss my long nails *wah*  I started with two easy coats of Julep Millie, a 2013 dark blue top pic.  If you want to see a full review of this blue eyed beauty, you can find it HERE, along with all my other dark blue top pics for 2013.


Next I added Avon Royal Blue using the saran wrap technique.  Royal Blue is a suede finish, which basically means matte metallic.


I added top coat next, because....well I always add top coat to my base before stamping!  That way, if I mess up, I can remove the stamped polish without damaging my base.  Plus it made Royal Blue into a sparkle fest (tee hee).  I could have stopped here and been very pleased, but the prompt is hearts, so.....

  
I stamped with LeaLaC LLC-B and Revlon Copper Penny.  See the little hearts?  I love this image for its' versatility.  It could be some ivy under a flower stamp too!  You can purchase LeaLac plates at Llarowe HERE.  Be forewarned, they are pricey, but worth every penny in my opinion.  I have used this plate multiple times and know that it will continue to be a stamping staple (tee hee) for me in the future.  The images are HUGE and stamp like a dream!  


I knew I was going to layer polish on those little hearts, and felt they were a little to small for that, so I made them bigger with more Copper Penny and a large dotting tool.


Next I added Butter London 2 Fingered Salute with a medium dotting tool, leaving a thin border of Copper Penny showing.  I again top coated, as the final polish is textured and I wanted to seal everything in before adding it.  What good is a textured polish if you top coat it?  Well, actually, this one is gorgeous with or without top coat!


Finally I added FingerPaints Sparkle in the Sky with my smallest dotting tool.  Here comes the spam!


Since I remembered to take a pic of every step (don't faint!), I decided to do my first step-by-step tutorial....thingy.  Enjoy!


 Although I used a stamp for this, you could easily create the same look freehand.  Every time I look at this, I am bombarded by all the color combos I could use!  Thanks for looking and commenting!  And don't forget to check out all the other Valentine appropriate manis!