A little late with this one. A quickie for the 12 Days of Christmas Ornament prompt.
I have had this done for over a week, but when I went to edit the pics, I realized that I had very few shots and all at the same angle. I don't know what I was thinking! I also didn't get any photos of this gorgeous base! So the plan was to re-swatch the base and maybe even stamp with a different color too. But then, once again....life. So I decided to just go ahead and show you what I have :)
This pic shows you the gorgeousness of the base....a little bit.
The base is three coats of I Love Nail Polish Mutgen (H), a holofied multichrome that shifts from green to blue to red to orange. I hope to to have a gif of this on it's own soon.
Next I stamped with Sugar Bubbles SB Special 002 and Maybelline Bold Gold. Some of the pattern gets lost in all that holo goodness. If I was to do this again, I would stamp with a non metallic polish....maybe a royal purple? With the closeness of the holo sparkle and gold polish, you really couldn't see the details. The hubby thought it was a dotticure (although he didn't call it that :)
So there you have it. Not horrible, but I wish I hadn't done it at 2:00 am so I would have been a little more on it with pics. Check the rest.
I rarely post polish hauls, but what came in the mail last week was too good not to share.
This year's Black Friday shopping was tough for me. Why? Limited budget and too many nail polish sales. I had to be very picky. I limited myself to only two indies and one "non indie" brand. How did I choose? Well Zoya was having a great special where if you purchased $72 in product, you got the largest Dream Box for FREE! Since Zoya is my favorite brand, this was a no brainer. As far as the indies went, I chose to purchase only from indies I did not already own. I also purchased some of the Bundle Monster plates while they were on sale, plus a 10% off valued customer discount I had from my last order. So guess what showed up at my door, all in one day! Wanna see?

Epic nail mail! I seem to have missed one package in the pic, but don't worry, you will see it's contents soon. The of the bubble package on the left is some stamping plates that I had preordered some time ago from Vivid Lacquer. There was a special unexpected surprise in there too, an extra plate! I hope to get them on the blog next week. The bubble package on the right is the Bundle Monster plates. I purchased the 2010 Revised Collection, which has larger images of their first release. The first set from 2010 has miniscule full nail images. However, I have always had a soft spot for them because they were my first stamping collection purchase. Needless to say, when I heard they were re-releasing the collection with larger images, I was ecstatic! The box in the middle is one of the indies, Wonder Beauty. And of course, there is the HUGE box from Zoya! So ya want to see the polishes I got? Sure you do! First up, the indies.

Wonder Beauty, from left to right: Vortex, Funnel Cloud, Storm Chaser and Cranberry (my first thermal polish!)


I Love Nail Polish Mutgen (H) and Birefringence (H). Look at that multichrome (which they call Ultra Chromes)! And the (H) means that it is also holo, as you can plainly see in the pic on the right. Be still my beating <3!
And finally what really made my heart sing! Beautiful polish gives me the warm fuzzies, but FREE gorgeous polish? Words fail me, so let's make up a new term....hot wollies.
This was what I purchased to reach $72. Zoya Remove + is my all time favorite polish remover. It makes removal easier, conditions my cuticles, AND smells so good. I have been wanting to buy some of the HUGE refill bottles and I also needed a new pump since one of mine died. I added two of the Fall Pixie Dusts, Carter (left) and Chita (right). These will both be featured soon! Now on to the REALLY good stuff. Here is EVERYTHING I got for free!
Half Time Polish Drying Accelerator (regularly $7.50. I haven't tried this yet), mini Color Lock System (Remove +, Anchor Base Coat, Armor Top Coat and Fast Drops, a $22 value) and another 2 oz of Remove + ($4.60 value).
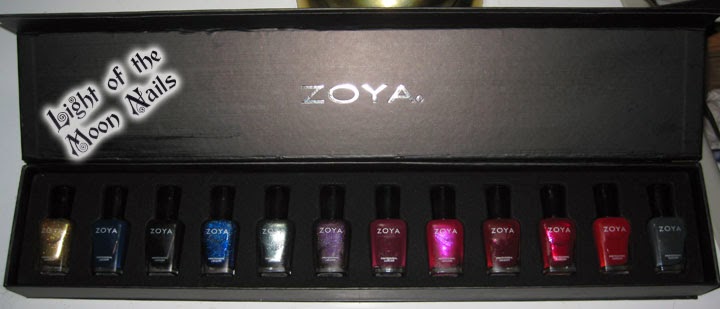
On to the REALLY exciting stuff, the Cheers To All Dream Box! Twelve glorious colors and not a one already in my stash! It is valued at $96! Want a closer look? Just know before you go on that I was so eager to get these pics taken, I couldn't even wait for the condensation to clear from the bottles (everything was practically frozen in the box).
Left to right: Ziv, Timo (in my wishlist), Black Swan and Dream (another wishlist dweller).
Cassedy, Payton (Wishlister), Sarah and Anaka
Dakota, Stacy, Rekha and Noot (another one on my wishlist).
So shall we figure this all out? I spent just under $78. The value of of all the free goodies....over $130! Have you done the math? Over $200 worth of product for a little under $78! That's like getting over 60% off! Plus I have a gorgeous box I can nestle all my favorite Zoyas in. Now if I only had a mani cave so I could display them.
Getting these packages all at once gave me that rare feeling that I used to get on Christmas morning as a child; unabashed joy! Hot woolies all around!
Did you get any good Black Friday deals? Any of them polish related? Tell me all about it....go ahead and brag! Thanks for visiting!
Tina
There have been a few people who have showed interest in the stamping decal technique, so today I am going to show you my mani for the 12 Days of Christmas challenge (where I used stamping decals) and give some tips and links for how to use stamping decals. Let's start with the mani. The prompt is "bells".
Other than the fact that I used the wrong outline color, I really like this.
This started with two coats of Wonder Beauty Storm Chaser over two coats of Spa Ritual Deep. Storm Chaser will get the spotlight (long with the other Wonder Beauty polishes I picked up recently) latter in the week.
Next I created some decals using Pueen 38 and Revlon Penny. Penny is a lovely copper that I use often for stamping. I thought I would work well with the copper glitter in Storm Chaser, but once I filled in the bells using Sally Hansen Insta-Dri Silver Sweep, poor Penny was a little overwhelmed and got lost in all the metallic glow. Seems every mani is a learning experience. I filled the bows with Sally Hansen Insta-Dri Snappy Sorbet. Let's talk about when I use stamping decals.
These are the images I wanted to use for this mani. This is the perfect example of three of the many reasons that I use stamping decals. Here are some of those reasons:
- An outlined image that I would like to have filled with color.
- An image that I only want to use a portion of.
- Creating an inverse copy of an image.
- If I have an image (or polish) that is fickle in it's stamping "perfection" (bald spots, dries to fast etc.) I can stamp multiple images and choose only the ones that stamped well.
- I want an image placed right where I want it.
For these bells, I wanted the little ones dancing along my tips like a festive french tip. Doing this without decals would have been one big PITA, but by using decals, I could place each little bell perfectly where I wanted it. Another great use for stamping decals is for those french tip images that never get the love they deserve because they are too hard to get lined up on the nails. Check my post HERE for an example.
To make a stamping decal, you stamp onto a slick surface, instead of your nails. Some people stamp onto sandwich bags or plastic binders. In one of my stamping groups, someone mentioned that they stamped on silicone spatulas because the decals released so easily. I had never had success with the baggies, so thought this might be a good alternative. Then someone mentioned that they use a silicone baking pad and whalla, my decal obsession was born. I found mine at Target, but I have heard that you can find them at Micheals and even dollar stores.
Here you can see the larger bell image stamped on the plate along with some finished decals.
After you have stamped the image on your slick surface, you can paint in any part you would like with polish or acrylic paints. After you are satisfied with the image, add a layer of top coat. After the top coat dries, you can carefully peel the image off the surface. I have a few tips regarding this step.
- Use a fast drying top coat. I always heard that you should let the top coated image sit for several hours before trying to remove it. I found that using a quick dry top coat means that you can remove it much quicker. I removed these decals from the silicone within 20 minutes of top coating them. I usually use Cult Nails Wicked Fast as it is thin and dries in a New York minute! I have used Seche Vite in the past, but the decals tend to be stiff, which makes them more difficult to apply. This brings us to the next tip.
- Use a thin layer of top coat. The thinner the layer, the more flexible the decal, the easier it is to apply to your nail. However, don't get too thin or the decal will rip when removing.
- I usually use tweezers to peel the decals off the silicone.
- If you don't plan on applying the decals right away, leave them attached to the silicone or seal them up in a baggie. The longer they are exposed to the air, the stiffer they get, the harder they are to apply.
Say you were going to use an image that was easily stamped on the nail. Why not just stamp on the nail and then fill in the lines?

 This is why! On the left you can see the filled in image. I really was trying to keep close to the lines! And then there is the smearing. That is partly because I was trying to get a thin top coat layer, but I have seen smearing this bad with regular application of top coat. Once you turn the decal over, all that mess gets pretty well covered and you have a nice filled decal with a crisp outline. Even the "shine line" show up, which I never would have been able to paint around. Even the smallest images can turn out looking sharp!
Next step! One nail at a time, add a layer of top coat and place your decal into the wet polish. Got more tips for this step too!
- Make sure you trim any extra top coat around the image.
- Leave as few sharp edges as possible. Corners have a tendency to stick up and are more stubborn about sticking flat to the nail. I use one of those little curved cuticle scissors to trim my images.
- When trimming your images, work on a light colored surface and a breeze free area. No fans for this part or you may have decals all over the place! I say a
- Be prepared! Have your decals lined up, an orange stick and tweezers handy because once you apply the top coat to your nails, you should move fast.
- Speaking of top coat, fast dry is the way to go again! You can use regular top coat, but you will spend a lot of time pressing the decal to the nail so it doesn't curl up while drying. Using fast dry mean less fussing around with the decal, but it also means that you have to work fast to get all the edges down before it all dries.
- Use tweezers to place the decals. Use the flat end of the orange stick with gentle pressure to press the edges down.
- If you are using a full nail decal or french tip image, trim the image wider than your nail bed. When you place the decal, you can hold down the sides with you fingers and get it nice an snug on the nail, then use polish remover and a small brush to clean up the extra polish around the edges.
Finally add another layer of topcoat to seal the decal in and smooth out all the edges. If you had some stubborn edges, use a thick top coat like Seche Vite or Posh to help the smoothing process. And that's it! It may sound like a lot of work, but with a little practice it will become almost as easy as regular stamping. The results are worth the effort in my book.
Well there you have it, my bells mani and as many tips as I could think of for a successful stamping decal mani. Want to see more ways I have used stamping decals (and how much I have improved)? Click on the "stamping decals" in the labels section on the right side of the blog. If you try this technique, let me see how it turned out with a link in the comments or on my Facebook page! Thanks for looking and reading....and reading....and reading :)
Tina
Can I share? Of course I can, it is my blog! I love blogging! I love doing my nails and sharing them with you. I even like editing the pictures. But the truth is that most of my free time is taken up with my computer. Between editing, blogging, reading my favorite blogs, Facebook and Pinterest, I spend hours every day with my computer on my lap and sometimes, it overwhelms me. Seems that every couple months I have to take a break, and the last few days were my most recent. For two whole days I did not touch my computer. No blogging, no Facebook, no email, not even picture editing. Of course, now I have to do some catching up, but it cleans out my system, if you know what I mean. I come back refreshed and ready to give it all a go again. So please forgive my absence (like you noticed :) and enjoy my latest nails.

I did these a couple weeks ago for Crumpet Nail Tarts 33 DC prompt "3 favorite polishes", but they never got posted. Luckily, they fit perfectly for the 12 Days of Christmas "festive colors/glitters" prompt, so yeah, you still get to see them!
I started with three coats of one of my all time favorite polishes, Digital Nails Run You Clever Boy. Because it is a favorite, this is going to be pic heavy. Get ready for a polish that is as glorious as all the Companions put together.
Run You Clever Boy was released by Raph this last spring in her "Companions of Doctor Who" collection and is not currently in the Digital Nails Etsy store. I am waiting to find out if it is discontinued or not and I will let you know. Why am I going to all the trouble to find out? Well look at this polish! If this was the first time I was seeing it, I would desperately want to add it to my stash. I mean, this polish has Lemming City written all over it! Update: Raphelle let me know that although this is not currently in stock, it is not discontinued and will hopefully be available in her store this Tues (link above)!
Run You Clever Boy represents Clara and is unlike anything else in my stash, which makes it an automatic winner in my book! The longer I have this nail polish obsession, the more I think that there is nothing new under the sun, and then Raph comes along and blows that out of the water!
Run You Clever Boy (I keep typing the whole name because....well, I love it!) Is a gorgeous brownish dark red jelly base (some call it oxblood) filled to the brim with green/pink shifting micro glitters. The base reminds me of BBQ sauce or a fresh scab. Okay, I know that sounds gross, but it has to be my all time favorite red color. What does that say about me?!?
Now that we have talked about the base, let's talk about the micro glitter in this beauty. Most color shifting micro glitters are impossible to capture. You have to hold you nails at funny angles or with weird focus or obscure lighting. Not with this beauty! The shift is so strong in real life that it is easy to capture in pics. I mean, look at the last two! Green/pink glittery goodness! I spent so much time looking at the shift on these! I could go on and on about my HUGE polish crush for Run You Clever Boy (I just had to type the name one more time!), but maybe you want to see more of the nail art?
Next I stamped with DRK-C and A-England Dragon, another polish favorite. Dragon is one of those gorgeous scattered holo polishes that A-England is so good at, this one in green. It also stamps great! The color matched the shimmer in Run You Clever Boy (looky there, I found another chance to type it!) so well, I couldn't imagine using anything else. I did make me a little sad to cover up Run You Clever Boy (did it again LOL) so much. Next time I will use a sparser stamp.
Just a note about this argyle pattern. I have a lot of argyle patterns in my plate stash, but this is my favorite! The pattern is small, so you get a lot of diamonds on the nail, even nubbins. Also, the diamonds are very....square....if that makes any sense. Right angles, not obtuse. It appeals to my sense of order.
Next I stripped with Zoya Cheryl, another all time favorite. I could have sworn I blogged about this beauty before, but I have looked and looked and can't find it. Such a shame! I will have to rectify that soon!
I think this looks Christmassy, don't you? Check out the others!
Get ready boys and girls, I got some gorgeousness coming your way courtesy of Essie. 12 days of Christmas prompt is snow/winter. Let's get right to it!
Look at that gorgeousness! Yep I am all about the texture recently.
This started with two coats of Essie Lots of Lux from their Encrusted Treasures collection. Such a stunning bright blue. This also is the most opaque textured polish I have purchased so far. It could easily be a one coater, but I used two coats because I know what macros do with visible nail lines. Yep this is pretty, but just wait for the top coat further down in the post.
Next I stamped with Sugar Bubbles SB Special 002 and Sally Hansen Insta-Dri Silver Sweep. This plate has my favorite Christmas/Holiday images. <3 it!
I like Essie Lots of Lux textured, but top coated this polish is stunning! All the sparkly bits, well they....sparkle :) So purdy! Here comes the spam!
What do you think? Best blue textured ever (so far)? Is it sparkly enough for ya? Wintery enough? Let me know! And thanks for looking!
Tina
November just flew by and it is now it is time for another challenge. I have a special place in my heart for Christmas challenges because my first ever nail challenge was one. Here is the schedule:
Today is "Presents". Since I was a little late to start on this challenge, I decided to do some quick art on what I currently was wearing. I say was, because I already have something else on my tips....my nails are so fickle :).
Yes, this is a textured polish and I will show it to you in a sec. First let me tell you that I have been going a little texture crazy with the polish lately, so you will probably be seeing several during this challenge. I really loved this one polish, so it is going to be a bit pic heavy.
This is two coats of Finger Paints Sparkle in the Sky. Such a lovely textured polish! It is a denim blue with green and pink micro glitters, which I tried desperately to capture in the following pics.
The glitters are very noticeable in real life, they were just a little camera shy.
I then added some ribbon using Sally Hansen Inst-Dri Silver sweep and Dandy Nails Cashmere Nights (bows).
Although I like the texture effect, I thought I would include one pic with top coat so you can see the sparkly goodness of Sparkle in the Sky. So appropriately named, don't you think?
What do you think of textured polish? When I first applied this, it was very rough and I thought I wouldn't be able to handle it, it really felt like a nail file, but by morning the roughness had calmed down and was very wearable. Feel free to check out all the other presents. As always, thanks for looking and commenting!
Tina
So November has come and gone and I still haven't got my giveaway up yet...it is coming. In the meantime, I have joined my first multibloger giveaway. Here's the dets. Good luck to all!
a Rafflecopter giveaway